
התחיל חודש חדש!
אתם יודעים מה זה אומר???
נכון... הדרכה חודשית חדשה!


חותכים 4 ריבועי קארדסטוק בצבעים שונים או 4 ניירות מדוגמים בגדלים 5X5 אינטש (12.7X12.7 ס"מ), 4X4 אינטש (10.2X10.2 ס"מ), 3X3 אינטש (7.6X7.6 ס"מ) ו-2X2 אינטש (5.1X5.1 ס"מ).

מפנצ'צ'ים מסביב לארבעת הריבועים הצבעוניים. אני השתמשתי בפאנץ' בורדר פינה של פיסקארס.

ליצירת עומק נוסף לכרטיס, הדביקו חתיכות קטנות של קרטון לגב הריבועים בגודל 4X4 ו-3X3 אינטש (10.2X10.2 ו-7.6X7.6 ס"מ)

הוסף נקודות דבק תלת מימדיות לגב הריבוע בגודל 2X2 אינטש (5.1X5.1 ס"מ). אפשר לחתוך נקודות דבק לחצי אם צריך.

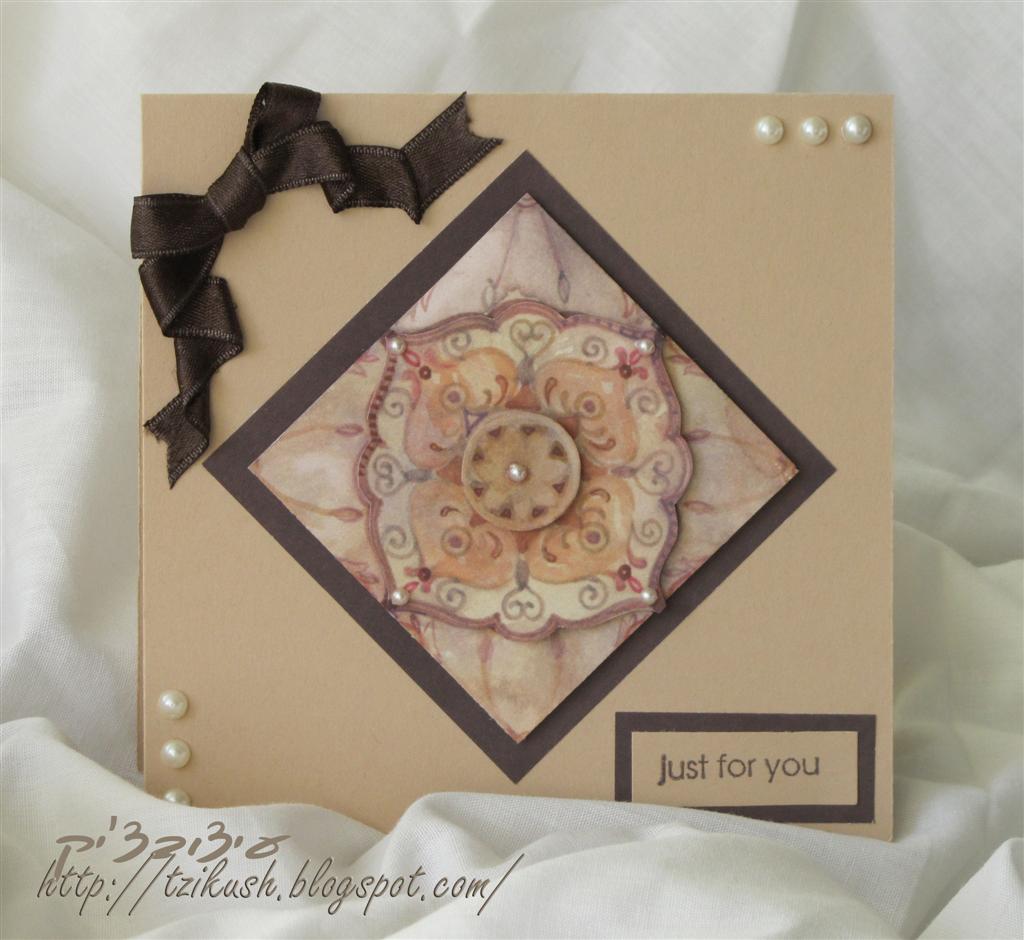
הדביקו את הריבוע בגודל 5X5 אינטש (12.7X12.7 ס"מ) לבסיס הכרטיס. הדבק את שאר הריבועים זה על גבי זה, כשהפינות שלהם פונות לכיוונים שונים בין השכבות (ראו בתמונה).
הוסיפו רצועת נייר עם הטקסט בעזרת שתי נקודות דבק תלת מימדי.
הוסיפו נקודות של Liquid Pearls – דבק תלת מימדי בצבע פנינתי – לפינות הריבועים.
הוסיפו כפתור קשור בחוט למרכז הריבוע הקטן ביותר.


אתם יודעים מה זה אומר???
נכון... הדרכה חודשית חדשה!
It's a new month!
Do you know what it means???
That's right... A new tutorial!
אבל לפני שנגיע להדרכה, הנה הזוכה של סקיצה 89:
But before we get to the tutorial, here's the winner for sketch 89:

אושרת - Oshrat
מזל טוב, אושרת. את נכנסת להגרלה החודשית על פרס הספונסר שלנו.
Congratulations, Oshrat. You enter the monthly draw for our sponser's prize.
והנה, בשלישיה המובילה, היחידה שעוד העלתה יצירה:
And in the Top3, the only other that uploaded a creation:

אורית - Orit

והנה הסקיצה החדשה שלנו, סקיצה 91:
And here's our new sketch, no. 91:

והאתגר הנילווה הוא: משהו מוגבה. משהו ביצירה שלכם צריך להיות מודבק בגובה.
And the challenge is: something raised. something in your creation needs to be raised.
והנה עבודות הצוות:
Here's what the team created:

אמנדה - Amanda

קרין די - Karin Di

קרין די (יצירה שניה) - (Karin Di (Second

מאיה - Maya

אורלי - Orli

ריקי - Riki

שיר - Shir
ציקוש - Tzikush

זהבית - Zehavit
ההדרכה החודשית - The Monthly Tutorial
את ההדרכה החודש הכינה מאיה.
Maya made this month's tutorial.
חותכים קארדסטוק לבן בגודל של 12X6 אינטש (30X15 ס"מ), חורצים במרכז ומקפלים לשניים כך שיתקבל כרטיס בגודל של 6X6 אינטש (15X15 ס"מ).
חותכים 4 ריבועי קארדסטוק בצבעים שונים או 4 ניירות מדוגמים בגדלים 5X5 אינטש (12.7X12.7 ס"מ), 4X4 אינטש (10.2X10.2 ס"מ), 3X3 אינטש (7.6X7.6 ס"מ) ו-2X2 אינטש (5.1X5.1 ס"מ).
Cut a 6"x12" piece of white cardstock, score in the middle and fold in half creating a 6"x6" card base. Cut 4 squares from colored cardstock or patterned paper - 5"x5", 4"x4", 3"x3" and 2"x2"

Punch around the edges of all 4 pieces of colored cardstock. I used Fiskars corner border punch.

ליצירת עומק נוסף לכרטיס, הדביקו חתיכות קטנות של קרטון לגב הריבועים בגודל 4X4 ו-3X3 אינטש (10.2X10.2 ו-7.6X7.6 ס"מ)
To created more depth to the card, adhere small pieces of chipboard or cardboard to the back of the 4"x4" and 3"x3" squares.

הוסף נקודות דבק תלת מימדיות לגב הריבוע בגודל 2X2 אינטש (5.1X5.1 ס"מ). אפשר לחתוך נקודות דבק לחצי אם צריך.
Add pop dots to the back of the 2"x2" square, cutting pop-dots in half if needed.

הדביקו את הריבוע בגודל 5X5 אינטש (12.7X12.7 ס"מ) לבסיס הכרטיס. הדבק את שאר הריבועים זה על גבי זה, כשהפינות שלהם פונות לכיוונים שונים בין השכבות (ראו בתמונה).
הוסיפו רצועת נייר עם הטקסט בעזרת שתי נקודות דבק תלת מימדי.
הוסיפו נקודות של Liquid Pearls – דבק תלת מימדי בצבע פנינתי – לפינות הריבועים.
הוסיפו כפתור קשור בחוט למרכז הריבוע הקטן ביותר.
Adhere the 5"x5" square to the card base. Layer the smaller squares on top rotating the layers.
Add a paper strip with the sentiment using two pop dots.
Add drops of liquid pearls to the corners of all squares.
Add a button with twine bow to the center of the smallest square.


5 תגובות:
איזה כיף!
תודה רבה!
ותודה על עוד הדרכה מקסימה!
אושרת
יופי של הדרכה וברכות לזוכה!
הרבה לא זמן לא ביקרתי - הכל מקסים. תודה !!!
Hi! Do you know if they make any plugins to help with SEO?
I'm trying to get my blog to rank for some targeted keywords but I'm not seeing very good gains.
If you know of any please share. Thank you!
Feel free to visit my blog reviews
Get some cumin seeds and grind them to put together
paste. It truly is so straightforward to get data about mole removal cream now-a-times.
Here is my webpage: dermatend before and after
הוסף רשומת תגובה